Contents
- xlrd/xlwt - 파이썬으로 엑셀 다루기
- xlrd/xlwt 설치하기
- xlrd 기본 사용
- xlwt 기본 사용
- xlrd/xlwt 조건식 사용하기
- xlrd/xlwt 여러 시트 다루기
- xlrd/xlwt 여러 파일 다루기
- xlrd/xlwt 통계 데이터 추출하기
- xlrd/xlwt 스타일 지정하기
- xlrd/xlwt 셀 병합하기
- xlrd/xlwt 열 너비 조절하기
Tutorials
- Python Tutorial
- NumPy Tutorial
- Matplotlib Tutorial
- PyQt5 Tutorial
- BeautifulSoup Tutorial
- xlrd/xlwt Tutorial
- Pillow Tutorial
- Googletrans Tutorial
- PyWin32 Tutorial
- PyAutoGUI Tutorial
- Pyperclip Tutorial
- TensorFlow Tutorial
- Tips and Examples
xlrd/xlwt 스타일 지정하기
xlwt의 write()를 이용해서 엑셀 파일을 생성할 때 스타일을 지정할 수 있습니다.
아래의 예제에서는 폰트 스타일, 폰트 크기, 색깔, 배경색, 정렬, 테두리, 폰트명을 다양하게 설정해 보겠습니다.
예제
import xlwt

# 새로운 워크북, 시트 생성
wbwt = xlwt.Workbook(encoding='utf-8')
ws = wbwt.add_sheet('Sheet1')

# 1. Font Style
# Normal
ws.write(0, 0, 'Normal')

# Bold
style1 = xlwt.easyxf('font: bold on')
ws.write(1, 0, 'Bold', style1)

# Italic
style2 = xlwt.easyxf('font: italic on')
ws.write(2, 0, 'Italic', style2)

# Underline
style3 = xlwt.easyxf('font: underline on')
ws.write(3, 0, 'Underline', style3)

# Shadow
style4 = xlwt.easyxf('font: shadow on')
ws.write(4, 0, 'Shadow', style4)

# 2. Font Size
# Default
ws.write(0, 1, 'Default')

# 8pts
style5 = xlwt.easyxf('font: height 160')
ws.write(1, 1, '8pts', style5)

# 10pts
style6 = xlwt.easyxf('font: height 200')
ws.write(2, 1, '10pts', style6)

# 12pts
style7 = xlwt.easyxf('font: height 240')
ws.write(3, 1, '12pts', style7)

# 16pts
style8 = xlwt.easyxf('font: height 320')
ws.write(4, 1, '16pts', style8)

# 3. Font Color
# Black
ws.write(0, 2, 'Black')

# Red
style9 = xlwt.easyxf('font: color_index red')
ws.write(1, 2, 'Red', style9)

# Blue
style10 = xlwt.easyxf('font: color_index blue')
ws.write(2, 2, 'Blue', style10)

# Green
style11 = xlwt.easyxf('font: color_index green')
ws.write(3, 2, 'Green', style11)

# Violet
style12 = xlwt.easyxf('font: color_index violet')
ws.write(4, 2, 'Violet', style12)

# 4. Background color
# None
ws.write(0, 3, 'None')

# Yellow
style13 = xlwt.easyxf('pattern: pattern solid, fore_color yellow')
ws.write(1, 3, 'Yellow', style13)

# Light Green
style14 = xlwt.easyxf('pattern: pattern solid, fore_color light_green')
ws.write(2, 3, 'Light Green', style14)

# Ice Blue
style15 = xlwt.easyxf('pattern: pattern solid, fore_color ice_blue')
ws.write(3, 3, 'Ice Blue', style15)

# Rose
style16 = xlwt.easyxf('pattern: pattern solid, fore_color rose')
ws.write(4, 3, 'Rose', style16)

# 5. Alignment
# General
ws.write(0, 4, 'General')

# style17
style17 = xlwt.easyxf('align: horizontal center')
ws.write(1, 4, 'Center', style17)

# style18
style18 = xlwt.easyxf('align: horizontal left')
ws.write(2, 4, 'Left', style18)

# style19
style19 = xlwt.easyxf('align: horizontal right')
ws.write(3, 4, 'Right', style19)

# style20
style20 = xlwt.easyxf('align: horizontal justified')
ws.write(4, 4, 'Justified', style20)

# 6. Border
# None
ws.write(0, 5, 'Border')

# style21
style21 = xlwt.easyxf('border: top thin, right thin, bottom thin, left thin')
ws.write(2, 5, 'Thin', style21)

# style22
style22 = xlwt.easyxf('border: top thick, right thick, bottom thick, left thick')
ws.write(4, 5, 'Thick', style22)

# 7. Font Name
# Default
ws.write(0, 6, 'Default')

# Arial
style23 = xlwt.easyxf('font: name arial')
ws.write(1, 6, 'Arial', style23)

# Courier New
style24 = xlwt.easyxf('font: name courier new')
ws.write(2, 6, 'Courier New', style24)

# Courier New
style25 = xlwt.easyxf('font: name verdana')
ws.write(3, 6, 'Verdana', style25)

# Times New Roman
style26 = xlwt.easyxf('font: name times new roman')
ws.write(4, 6, 'Times New Roman', style26)

# 파일 저장하기
wbwt.save('result_style.xls')
xlwt.easyxf()는 write()에 스타일을 입력하는데 사용하는 XFStyle 객체를 생성하기 위해 사용합니다.
xlwt에서 지정할 수 있는 다양한 색상의 이름은 다음의 링크를 참고하세요.
저장되는 엑셀 파일은 아래와 같습니다.
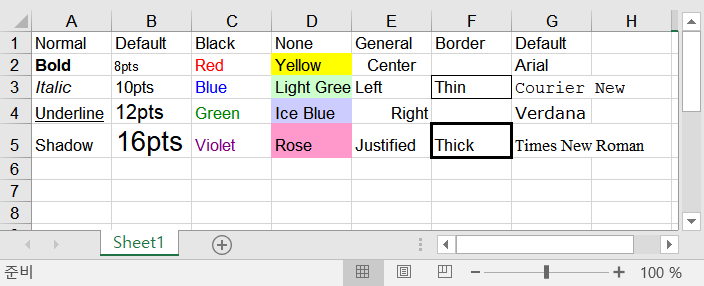
result_style.xls
이전글/다음글
이전글 : xlrd/xlwt 통계 데이터 추출하기
다음글 : xlrd/xlwt 셀 병합하기